Saturday, December 17, 2011

Soft Sugar Cookies with Frosting

I'll admit it. I'm a total sucker for those grocery store sugar cookies in the plastic container with different colored frosting for every imaginable holiday. Orange and black for Halloween? Yum. Red, white, and blue for Fourth of July? Don't mind if I do. Pink, white, and red for Valentine's Day? Do you even have to ask? Loaded with preservatives and artificial ingredients though, I'm sure they're not the greatest food in the world health-wise. And while I'm sure the home-made version isn't toooo much better for you, at least they are slightly more natural? Maybe? At least that's what I'm telling myself.

These cookies totally live up to their name is softness. They have a rich buttery taste, and are completely satisfying. And with the endless combinations of frosting and sprinkle colors, they can truly work for any holiday!


Soft Sugar Cookies with Frosting
Makes 24 cookies

For the cookies:
4 1/2 cups of all-purpose flour
4 1/2 teaspoons of baking powder
3/4 teaspoons of salt
1 1/2 cups (3 sticks) of butter, at room temperature
1 1/2 cups of sugar
3 large eggs
5 teaspoons of vanilla extract
For the frosting:
4 cups of powdered sugar
1 stick of unsalted butter, melted
1 Tablespoon of vanilla extract
5 Tablespoons of milk (and more, if needed)

Directions: Preheat the oven to 350. Line two baking sheets with parchment paper. In a bowl, combine flour, baking powder, and salt. Whisk together to blend. In the bowl of an electric mixer, combine the butter and sugar and beat together on medium-high speed until soft and fluffy, about 2-3 minutes. Beat in the eggs one at a time, mixing well after each addition. Scrape down the sides of the bowl as needed. Beat in the vanilla. Turn the mixer to low, and add the dry ingredients. Mix until just combined. Place dough in non-metal bowl, cover with plastic wrap, and chill for one hour. (I had some straggler dry ingredients at the bowl when I was done, if you do- don't mix them in with the dough.)

After the dough has chilled, scoop a heaping Tablespoon of dough into your hands and roll it into a ball. Place on the parchment-lined baking sheet, and flatten the ball slightly with the bottom of a glass.  Repeat with the remaining dough, spacing the cookies 2-3 inches apart. Bake for about 10-12 minutes. You don't want to even let them get to a golden brown- and if so, just slightly. Let cool on the baking sheet for several minutes, and transfer to a wire rack to cool completely.

To make the frosting, place the confectioners sugar in the bowl of an electric mixer. Add the melted butter, vanilla, and milk to the bowl and beat until smooth. Whisk in additional milk if icing is too thick, one teaspoon at a time, until you reach your desired consistency. Color frosting with gel food coloring, and frost cookies. Top with sprinkles, and store in an airtight container. Enjoy!

Adapted from Annie's Eats, original recipe here.

Wednesday, December 14, 2011

Pumpkin Cream Sauce with Sage

I love pumpkin in all of its forms- I love it in sweet desserts, I love it savory dishes, I love it in hearty breakfasts. I haven't exactly kept this love of pumpkin I have a secret. And likewise, I can't keep this sauce a secret. I was totally surprised by this one; I threw it together as a one of those "I have these ingredients on hand- it sounds like they could go together- I hope dinner ends up edible" dishes. Oh man, was it edible. I may or may not have eaten the extra sauce up with a spoon.

I've had sauces like this in restaurants, and hoped I could recreate something similar. It has a rich, slightly sweet flavor, and was so good over a mushroom ravioli. We also had it over gnocchi, sausage ravioli, mushroom fettuccine (yes, we had it that many times- it's a great way to use up leftover pumpkin), but the winner was the mushroom ravioli. I'm sure we'll be trying it many other ways as well!


Pumpkin Cream Sauce with Sage

3 heaping Tablespoons of pumpkin puree
1/4 cup of heavy cream (or half and half if you want to keep it lighter)
1 Tablespoon of chopped sage leaves
1 teaspoon of Kosher salt
dash of black pepper

1/4 cup of fresh shaved Parmesan cheese

Directions: Heat pumpkin, cream, sage, salt, and pepper in a small saucepan over medium heat. Stir to combine, and bring to a slight simmer. Allow to cook for a couple minutes, and stir in the Parmesan cheese. Continue to stir, as the cheese melts and sauce thickens. Serve over pasta or ravioli, and garnish with a bit of shaved Parmesan. Enjoy!

A Little Domestic Bliss original ;)

Wednesday, December 7, 2011

Indian Spiced Roasted Squash Soup

I don't think there is anything more comforting than a warm bowl of soup on a cold day. We have been having a freak warm streak lately, but it has finally cooled down enough to properly savor a nice warm bowl. I have been trying to find some different versions- a bit of a twist if you will- on the classic recipes. And since I am still buying squash after squash like it's going out of style, this Indian-spiced roasted squash soup recipe I saw in Cooking Light was perfect!

This is not the greatest picture- soups are so difficult to get a good shot of- but it is definitely better than this picture looks! It had just the perfect amount of spiciness, and the sweet yogurt garnish balanced that perfectly. It is definitely a new twist on an old standby.


Indian Spiced Roasted Squash Soup

1 yellow onion, chopped
8 ounces of carrots, chopped
4 garlic cloves, peeled
1 medium butternut squash, peeled and cut into 1" cubes
1 medium acorn squash, quartered
1 Tablespoon of olive oil
dash of black pepper

32 ounces of vegetable broth
1 teaspoon of curry powder
1/2 teaspoon of garam masala
dash of cayenne pepper
1/2 teaspoon of Kosher salt

6 Tablespoons of plain Greek yogurt
4 Tablespoons of honey

Directions: Preheat oven to 450. Place the onion, carrots, garlic cloves, butternut squash, and acorn squash on an olive oil-greased jelly-roll pan. Drizzle with olive oil, sprinkle with pepper, and toss to coat. Roast for 30 minutes, or until vegetables are tender.

Put the vegetable mixture into a large stock pot on the stove.  Add the vegetable broth, curry powder, garam masala, cayenne pepper, and salt. Using an immersion blender, puree until smooth. Bring soup to a boil, then reduce and allow to simmer for about 20 minutes.

Combine the Greek yogurt and honey, and stir until smooth. Drizzle over soup and serve. Enjoy!

Adapted from Cooking Light, original recipe here.

Saturday, November 26, 2011

Hot Artichoke Dip

I think I found my go-to hot dip recipe.

Last week, one of my co-workers held a vinatge/craft open-house at her place. She does truly amazing things with found materials and vintage "junk." There were cake stands and platters made with vintage plates glued to old candlesticks, wine bottle stoppers made from antique doorknobs and faucet hardware, and rings made from vintage earrings and brooches. Everything was gorgeous! I ended up buying this ring, I absolutely love the colors.


But what does this have to do with dip? Nothing, really, except that she served a dip very similar to this one! I loved it, may have eaten too much of it, and immediately put it on the list of appetizers to bring to Thanksgiving at the in-laws'.

It was a huge hit at Thanksgiving- totally comforting and delicious. I almost felt bad accepting the compliments, it was too easy as well!


Hot Artichoke Dip

1 cup of shredded Parmesan cheese
1 cup of mayonnaise
1 bunch of green onions, chopped
1 teaspoon of garlic powder
1/2 teaspoon of salt
dash of black pepper

2 cans of artichoke hearts, roughly chopped

Directions: Preheat oven to 325. In a food processor, mix the Parmesan cheese, mayonnaise, green onions, garlic powder, salt, and pepper until well combined. In a large bowl, mix the mayonnaise mixture together with the chopped artichokes. Stir to combine well.

Spread dip into a 9 x 13 glass pan, and bake for 30 minutes, or until top is slightly golden brown. Allow to cool for about 10 minutes, and serve hot with crackers or crostini. Enjoy!

(I kept it warm throughout the afternoon in a mini crockpot, but it is just as good at room temperature!)

Adapted from allrecipes.com, original recipe here.

Sunday, October 30, 2011

Pumpkin Chili and October Snow

It snowed yesterday. Not much snow, just a dusting really- maybe a whole inch in the places it actually stuck to the ground. But the amount wasn't the crazy part. The crazy part is that it's still October! It just does not snow around here that early. I remember going up to my great-aunt's house (at a higher elevation) for Thanksgiving when I was little and being amazed that they had snow on the ground already- at the end of November! So having snow here a whole month earlier than that is pretty darn crazy!


I wasn't complaining though- a cold snowy day definitely provided the opportunity I was waiting for to make a batch of pumpkin chili I had my eye on. I am so glad I did, it was absolutely perfect for a blustery day :)

It wasn't very different from regular chili- the pumpkin taste isn't extremely strong. If you didn't know it was in there, you probably wouldn't be able to pick it up. But the pumpkin did provide a rich and just slightly sweet flavor that added a great "je ne sais quois" to the chili. And as most crock-pot dinners are, this is completely easy to prepare and smells amazing all day!


Pumpkin Chili

2 Tablespoons of olive oil, divided
1 large onion, chopped
1 green bell pepper, chopped
1 red (or yellow) bell pepper, chopped
3 large garlic cloves, minced
1 1/2 lbs. of ground turkey
1 (28 oz.) can of fire-roasted diced tomatoes with juice
1 (14.5 oz) can (or 2 cups) of red kidney beans, rinsed and drained
1 (14.5 oz) can (or 2 cups) of black beans, rinsed and drained
1 cup of frozen corn
1 (14.5 oz.) can of pumpkin puree
1 1/2 Tablespoons of chili powder
1/2 Tablespoon of cumin
dash of cayenne pepper
3/4 teaspoon of salt
1/2 teaspoon of freshly ground black pepper

For serving:
fresh cilantro
Cheddar cheese, shredded
sour cream

Directions: Heat 1 Tablespoon of olive oil in a large skillet over medium-high heat. Sauté the onion, green bell pepper, red (or yellow) bell pepper, and garlic until tender, about 8 minutes. When they're done, transfer them to a slow cooker.

Using the same skillet, still over medium high heat, add the other Tablespoon of olive oil. When oil is heated, add the ground turkey, and stirring often to crumble, brown it for about 10 minutes. When it's done, transfer the turkey into slow cooker.

Add the tomatoes, beans, corn, and pumpkin, stir to combine. Add the chili powder, cumin, cayenne, salt, and pepper, and stir to mix spices in. Cook on low for 6-8 hours, or on high for 4-6. Serve with shredded Cheddar cheese, sour cream, and fresh cilantro. Enjoy!

Adapted from What's Cookin', Chicago? original recipe here.

Saturday, October 29, 2011

Moroccan-Style Stuffed Acorn Squash

H and I have been eating a lot of acorn squash lately. We've received a lot of them from the CSA, and they have been tempting me in grocery store as well. I usually roast them with a bit of butter, salt, pepper, nutmeg, and brown sugar- which are delicious, but are getting a bit boring! So when I saw this recipe for a Moroccan-style stuffed acorn squash, it immediately went on the menu. It definitely sounded like a different and delicious thing to do with acorn squash!

We only used one acorn squash, rather than the two the recipe called for, so it definitely made more stuffing than needed, but it was great leftovers for lunch the next day. It is tasty, filling, healthy and easy to make. What else could you ask for?


Moroccan-Style Stuffed Acorn Squash

2 acorn squashes, halved and seeded
2 Tablespoons of olive oil, divided
2 cloves garlic, minced
2 stalks celery, chopped
2 large carrots, chopped
1 (15 oz.) can (or about 2 cups) of garbanzo beans, drained
1/2 cup raisins
1 1/2 Tablespoons ground cumin
salt and pepper to taste
2 cups of vegetable broth
1 1/2 cups of uncooked couscous

Directions: Preheat oven to 375. Rub one Tablespoon of olive oil on insides of squash and season with salt and pepper. Place them on a baking sheet lined with aluminum foil, flesh side up. Roast for about 30 minutes, or until mostly soft.

When there is about 15 minutes left on the squash, heat the other Tablespoon of olive oil in a large skillet over medium heat. Stir in the garlic, celery, and carrots, and cook for about 5 minutes. Mix in the garbanzo beans, raisins, cumin, salt, and pepper, and continue to cook and stir until vegetables are tender. Pour the vegetable broth into the skillet, and mix in the couscous. Cover, and turn off the heat. 

Allow couscous to sit for about 5 minutes to absorb liquid. Remove cover, fluff with a fork, and stuff squash halves with the couscous. Place in the oven for about 10 minutes, to get a slight crisp on top. Enjoy!

Adapted from allrceipes.com, original recipe here.

Thursday, October 27, 2011

Sweet Potato and Black Bean Enchiladas

I came across this recipe when I was looking for something different to do with tortillas. I was hoping for a roasted vegetable enchilada, but was intrigued (and a bit skeptical!) by this one. The only way to find out for sure though, is to try it of course!

The flavor was complex and interesting: it had the sweet from the sweet potato, the savory from the tomatoes, and the spicy from the poblano. They all blended together really well and it was a tasty, filling, and very healthy meal!


Sweet Potato and Black Bean Enchiladas

2 large sweet potatoes
1 Tablespoon of olive oil
1 large garlic clove, minced
1 small poblano pepper, seeded and chopped
1 (14.5 oz.) can of black beans, drained and rinsed
1 (14.5 oz.) can of diced tomatoes, drained
1 Tablespoon of chili powder
Kosher salt and black pepper to taste
2 cups of salsa
8 large flour tortillas
1/2 of an onion, chopped
1/3 cup of cheddar cheese, shredded

Directions: Preheat oven to 425. Wrap the sweet potatoes in aluminum foil and roast for about an hour, or until soft when poked with a fork. Unwrap, cut in half, and set aside.

Turn oven down to 350. Heat the olive oil in a large skillet over medium. Add minced garlic and chopped poblano, stirring frequently until fragrant. Add black beans, tomatoes, chili powder, and salt and pepper to taste. Scoop out cooked sweet potatoes, add them to the skillet, and simmer mixture 5 minutes. Remove from heat.

Spread enough salsa on the bottom of a 9x13" pan to cover. Place tortilla on a flat surface, fill with sweet potato mixture, and roll tightly. Place the enchilada in the pan. Continue with each tortilla shell, until all are filled. If there is any filling left over, spoon it on top of the enchiladas, then top with remaining salsa and sprinkle with onion and shredded cheddar.

Bake until casserole is hot and bubbly, about 20 minutes. Enjoy!

Adapted from Care2/Greenliving, original recipe here.

Sunday, October 23, 2011

CSA Basket- Week Fifteen

Last week in our basket, we received a kohlrabi, two bunches of red kale, a bunch of radishes, a large head of romaine, two green peppers, one red pepper, four red ripe tomatoes, five heirloom tomatoes, a spaghetti squash, a delicata squash, a pint of cherry tomatoes, and a pint of heirloom cherry tomatoes.


Friday, October 21, 2011

Classic Meatloaf

I sometimes feel like meatloaf gets a bad rap. It's something that people tend to make fun of, as if it's something that no one really wants to eat. That it's dry, boring, and bad. I don't think so! It's something I loved as a kid, but didn't actually have my own recipe for. I was excited to try this one, and when you need something to make with your macaroni and cheese (as I did), meatloaf is a classic choice!

H declared this "the best meatloaf ever" so it has to be doing something right! It was moist and flavorful and very easy to throw together. It will definitely be put on the rotation around here!


Classic Meatloaf
(serves 4)

1/2 Tablespoon of olive oil
1/2 cup chopped onion
6 tablespoons of ketchup, divided in half
1/2 cup of panko 
1 teaspoon of Worcestershire sauce
3/4 teaspoon of dried oregano
1/4 teaspoon of salt
1/4 teaspoon of fresh ground black pepper
1 pound ground sirloin
1 egg, beaten

Directions: Preheat oven to 350. Heat oil in a pan over medium heat. Add onion to pan and cook for about 6 minutes, or until tender, stirring occasionally. Remove pan from the heat and allow to cool slightly. Combine the onion, 3 Tablespoons of ketchup, and remaining ingredients in a large bowl, and mix with your hands until just combined.

Coat a 8x8" pan with a bit of olive oil. Shape meat into a loaf, place in the pan, and brush the top with the remaining ketchup. Bake for about 35 minutes, or until a thermometer registers 160. Let stand for 10 minutes before serving. Enjoy!

Adapted from Cooking Light, original recipe here.

Sunday, October 16, 2011

CSA Basket- Week Fourteen

There was a bit of a delay in our CSA baskets. Because it was such a rainy August and September, the fall-ier (is that a word?) crops were behind schedule. So we had a few weeks off, and it started back up again this past week.

We received two bunches of green leaf lettuce, an acorn squash, a butternut squash, a spaghetti squash, two white peppers, a red pepper, three heirloom tomatoes, three red ripe tomatoes, a pint of cherry tomatoes, and a pint of cherry heirloom tomatoes. I am so glad that there were more tomatoes to be had! The ones at the grocery store and even the ones from our tomato plants were starting to get that mealy, wintery taste. I'm loving fall in that pumpkin and apple way, but I'm not ready to give up these tomatoes!


Saturday, October 15, 2011

Creamy, Lighter Macaroni and Cheese

There is nothing more delicious and comforting than my mom's homemade macaroni and cheese. Now I know a lot of people make that very same claim, but I doubt most of them have ever tried my mom's recipe! I'm kidding, kidding, of course...

But while there are a hundred wonderful things that can be said about my mom's macaroni and cheese, "healthy" is just not one of them. So when I saw this recipe for Creamy, Light Macaroni and Cheese in the September issue of Cooking Light, I was skeptical, to say the least. I may have even scoffed at it a bit- "Really? Butternut squash? Macaroni and cheese is no place for pureed vegetables!"

But nevertheless, it had me intrigued, and I kept going back to it. I finally had to make it just to see if it could measure up. I have to say, I was pleasantly surprised! It definitely held up to the claim of "creamy," which is something I have found difficult to achieve in macaroni and cheese without using Velveeta (which is something I try to avoid, since non-refrigerated cheese kind of icks me out!). The original recipe called for Gruyere and since I am not a huge fan, I replaced the Gruyere in the original recipe with a smoked Gouda. The flavor was incredible!

It didn't take two weeks for this one to reappear on the meal plan!


Creamy, Lighter Macaroni and Cheese
(serves 8)

1 large butternut squash, peeled, seeded, and cubed
1 1/4 cups of chicken or vegetable stock
1 1/2 cups of skim milk
2 cloves of garlic
1 teaspoon of Kosher salt
1/2 teaspoon of black pepper
1 cup of fat-free plain Greek yogurt
6 oz. of Cheddar cheese, shredded
4 oz. of Gouda, shredded
1 teaspoon of dried mustard
1 teaspoon of smoked paprika
1 pound of uncooked pasta (cavatappi, shells, or some other kind that grabs the sauce)
1 teaspoon of olive oil
1 oz. of Parmesan, shredded
1/2 cup of panko

Directions: Place the cubed butternut squash, broth, milk, garlic cloves, salt and pepper in a large stock pot. Bring to a boil, and then reduce to a simmer. Simmer for about 25 minutes, or until the squash is soft.

After the 25 minutes, preheat the oven to 375. Bring a large pot of water to a boil and cook pasta according to package directions.

Remove the squash mixture from the heat, and add the Greek yogurt. With an immersion blender, puree until smooth. (If you don't have an immersion blender, use a regular blender with the center part of the lid removed to allow steam to escape. Cover with a clean towel to avoid splatter, and pour back into the stock pot.)

Add the cheddar, Gouda, dried mustard, and paprika. Stir until cheese is melted and all is well combined. When pasta is done, combine cheese mixture and drained pasta. Stir to cover the pasta in the sauce.

Grease a 9x13 pan with a bit of olive oil. Pour the pasta and cheese mixture in. Top with the panko and Parmesan. Bake for 30 minutes, or until top is golden brown and cheese is bubbly. Enjoy!

Adapted from Cooking Light, original recipe here.

Sunday, September 18, 2011

CSA Basket- Week Thirteen

This week we received a bunch of collard greens, a spaghetti squash, an eggplant, a bunch of leeks, a bag of small German potatoes, an acorn squash, two red peppers, two purple peppers, a butternut squash, four red ripe tomatoes, and two heirloom tomatoes. I'm excited for all the squash, it means fall is almost here!


Tuesday, September 13, 2011

Mediterranean Couscous Bake

I'm a huge proponent of meal planning. I think it saves time and money, and helps keep one organized. It also involves making lists, which is something I'm strangely addicted to. However, I usually meal plan on Saturday for the following week and we go grocery shopping on Sunday. Having our CSA pick-up on Mondays sort of throws me for a loop. Since I don't know what we are going to get ahead of time, I am sometimes stuck trying to come up with a way to use something I totally wasn't expecting. And that is exactly how this dinner came about.

I have to admit that I'm particularly proud of this recipe. I wasn't going off of anything, just combining the vegetables that I needed to use up and keeping my fingers crossed. I was pleasantly surprised with the outcome. The vegetables have great flavor without much added to them, and it is great as leftovers as well. I might have to try this one again! 


Mediterranean Couscous Bake
(serves 6 as a side, 4 as a main course)

2 green peppers, sliced
1 medium eggplant, peeled and chopped
drizzle of olive oil
2 cloves of garlic, minced
2 large tomatoes, chopped
1 cup of dry couscous
1 Tablespoon of butter
pinch of salt
1 teaspoon of dry oregano
1/2 cup of feta cheese

Directions: Preheat oven to 350. Grease a 9 x 13 pan with a bit of olive oil.

Cook peppers and eggplant in a large pan with the olive oil and garlic until eggplant is cooked and peppers are soft. Put them in the greased pan, and add the chopped tomatoes. Stir to combine. Cook couscous according to package directions, with the butter and salt in the water. When couscous is done, add it to the pan. Add the oregano and feta, and stir to combine. Sprinkle a bit more feta on top, cover with aluminum foil, and bake for 20 minutes. Remove foil, and bake for 10 more. Enjoy!

Saturday, September 10, 2011

Peach Bars with Crumb Topping

It's hard to believe I had these peaches sitting around the kitchen for almost a week before I could decide what to make with them. I thought about pie, I thought about jam, I thought about peach shortbread cookies, but nothing seemed right. I finally decided on these peach crumb bars, and I am certainly glad I did!

I actually added a couple plums to the peaches in the filling and they gave it a bit of a tangy kick. They are the perfect combination of flavors and texture- a buttery, almost shortbread-y crust, sweet peach filling, and a nice, crumbly top. They went fast!


Peach Crumb Bars

1 1/2 cups of sugar, divided into 1 and 1/2 cup portions
1 teaspoon of baking powder
3 cups all-purpose flour
1/4 teaspoon of salt
zest of one lemon
16 Tablespoons (2 sticks) of cold, unsalted butter cut into 1/4" pieces
1 large egg
5 cups peeled, chopped peaches- about 5 peaches (I used 4 peaches and 2 small plums)
5 teaspoons of cornstarch
juice of one lemon
1/4 teapoon of nutmeg

Directions: Preheat oven to 375.  Grease a 9 x 13 pan with butter, and set aside.

In a medium bowl, combine 1 cup of the sugar, the baking powder and flour. Add the salt and lemon zest, and stir together with a fork. Mix in the butter and egg with a pastry blender until the mixture resembles coarse sand. Place about half of the dough mixture in the greased pan and press down to cover the bottom of the pan.

In a separate bowl, stir together the remaining sugar, cornstarch, lemon juice and nutmeg. Gently mix in the peaches and stir lightly until combined. Using a slotted spoon, spread the fruit evenly over the crust. Sprinkle the remaining dough with over the top of the peaches.

Bake for about 45 minutes or until the top is slightly golden brown. Cool completely before cutting and serving. Enjoy!

Adapted from Annie's Eats, original recipe here.

Thursday, September 8, 2011

CSA Basket- Week Twelve

We had a break from our CSA pick-ups last week, but it resumed this week. I was slacking though and forgot to snap a picture- it was just one of those days. I was held up at work and barely got to the pick-up in time, H had his first night class this semester so he couldn't go for me, it started pouring just as I pulled into the driveway, and the phone started ringing as soon as I got in the house. Oye! That night definitey called for a glass of wine :)

It was quite a haul despite the lack of picture- two yellow tomatoes, three red ripe tomatoes, one pint of heirloom mini-plum tomatoes, two bunches of collard greens, one pint of small German potatoes, two yellow peppers, three Italian roasting peppers, a spaghetti squash, two bunches of sage, and an eggplant.

Thursday, September 1, 2011

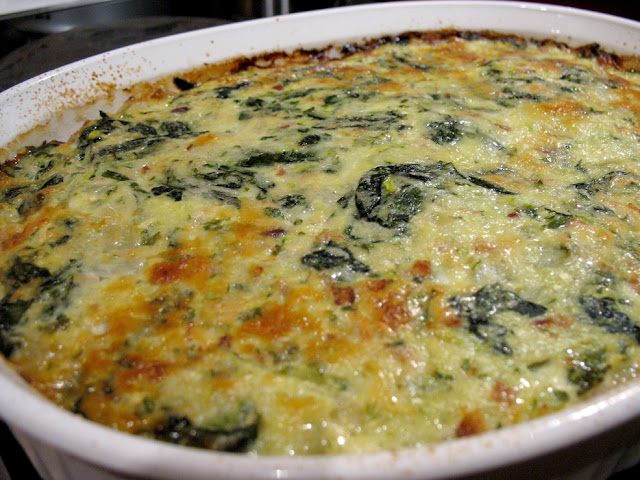
Zucchini and Spinach Gratin

As soon as I saw this recipe, I knew I wanted to make it as soon as possible. I am one of those people who loves bacon a little too much, and I loved the veggies in it as well. I just had a feeling this one was going to be a winner!

It ended up being a great side for chicken and roasted tomatoes, and it worked great as leftovers too!


Spinach and Zucchini Gratin
(serves 6)

2 large zucchinis
pinch of Kosher salt
drizzle of olive oil
6 cups of fresh spinach

4 slices of thick cut bacon
1 handful of fresh parsley
1 white onion, sliced
3 cloves of garlic, minced

3 eggs, beaten
1/2 cup of Parmesan cheese, shredded
drizzle of olive oil

Directions: Grate zucchinis in a food processor, and place grated zucchini in a strainer over a bowl. Squeeze out as much liquid as possible, sprinkle with Kosher salt, and allow to sit over the bowl for 30 minutes. Heat olive oil in a medium saucepan, and add spinach. Cook for a few minutes, stirring occasionally, until spinach is mostly wilted. Place in another strainer over a bowl, squeeze out as much liquid as possible and allow to sit for 30 minutes as well.

Meanwhile, heat saucepan to medium high and add bacon. Cook for about 5 minutes on each side and remove. Pulse the bacon and with the parsley in a food processor until it's well chopped and set aside. Add sliced onion to the heated pan with bacon grease and cook for about 5 minutes, stirring occasionally. Add minced garlic, and cook for another 5 minutes. Place cooked onion and garlic in a large bowl, and add the bacon and parsley. Preheat oven to 350.

After zucchini and spinach are drained well, place them in the large bowl with the onion, garlic, bacon, and parsley and stir to combine. Add beaten egg and half of the Parmesan to the bowl and combine. Grease bottom and sides of a gratin dish with olive oil. Press vegetable mixture into bowl, and sprinkle the rest of the Parmesan cheese on top. Bake for 40-45 minutes. Enjoy!

Adapeted from Simply Recipes, original recipe here.  

Wednesday, August 24, 2011

CSA Basket- Week Eleven

I can't believe it's been 11 weeks of farm fresh goodness already! Where did the summer go? I'm really going to miss the fresh produce and lower grocery bill in the winter...

This week's bounty includeda canary melon, red kale, a kohlrabi, two beets with greens, two white peppers, four green peppers, an eggplant, a red ripe tomato, a pint of raspberries, and a watermelon.


Sunday, August 21, 2011

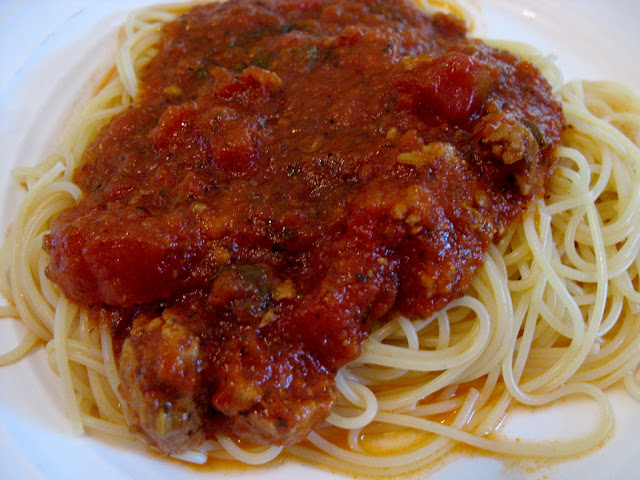
Tomato, Sausage, and Basil Marinara Sauce

Our CSA had plum tomatoes for sale this past week, in addition to the tomatoes we got in the regular basket. Since I had been itching to try my hand at homemade tomato sauce lately, we decided to buy some. And by some, I mean 25 pounds. Go big or go home, right?

Well, it turns out that 25 pounds is a heck of a lot of tomatoes. I didn't even use half in my first big stock pot full of sauce. But the plan was to make a ton and freeze most of it for the winter, so I'm sure it'll be fine. The first batch I made was a Tomato, Sausage, and Basil Marinara. Of course, we had to try a bit for dinner before freezing it. It was really good, and definitely a nice twist on the standard red sauce. I'm glad we'll be enjoying this all winter!


Tomato, Sausage, and Basil Marinara Sauce
(makes roughly 15 cups)

30 plum tomatoes
1 (28 oz.) can of fire-roasted diced tomatoes
2 (28 oz.) cans of tomato sauce
1/4 cup of red wine (I used merlot)
3 Tablespoons of dried basil
3 Tablespoons of dried oregano
1 Tablespoon of ground fennel seed
6 large cloves of garlic, minced
1 teaspoon of Kosher salt
1/4 teaspoon of black pepper
5 bay leaves

6 links of Italian pork sausage (I used mild, as a preference, but hot would work too)
1 Tablespoon of olive oil

1/2 cup of chopped fresh basil
1/4 cup of chopped fresh oregano

Directions: Bring a large pot of water to a boil. 

Fill a large bowl half way with iced cubes and cold water, and set aside. Lightly slice an "x" in the skin of each plum tomato. When water is boiling, place the tomatoes in (I did about 6-8 at a time). Let them boil for a couple minutes, until skin starts to peel back from the sliced areas. Using a slotted spoon, place in the iced water to cool for a couple minutes and halt the cooking. When they have cooled somewhat, the skin should peel right off. Peel and dice them, and place them in a large bowl. Repeat until all the tomatoes are done. 

Place fresh diced tomatoes, canned sauce, canned diced tomatoes, red wine, dried basil, dried oregano, ground fennel seed, garlic, salt, pepper, and bay leaves in a large stock pot. (I couldn't find ground fennel seed, so I used whole fennel seeds that I ran through an empty pepper-mill.) Bring to a light simmer, cover, and allow to simmer for 1.5 hours. 

After 1.5 hours, heat 1 Tablespoon of olive oil in a saucepan over medium-high. Squeeze sausages out of the casings into the saucepan. Brown the sausage, breaking up the pieces with a fork. When the sausage is browned, add it to the sauce, give it a good stir, re-cover, and allow to simmer for another 2-3 hours. Sauce should be reduced down a good amount from where it started.

Remove from heat, and stir in the fresh basil and oregano. Allow to cool before freezing. Enjoy!

Adapted from Kalyn's Kitchen, original recipe here.

Saturday, August 20, 2011

Gnocchi with Zucchini Ribbons and Cherry Tomatoes

This has to be one of the easiest dinners I've made in a long time. I did find it in a section of "Weeknight Meals Ready in Under 20 Minutes" so I guess I shouldn't be surprised, but I still wasn't quite expecting this easy. Not only was it an absolute cinch to put together, it was perfectly timed- the veggies cook in the same amount of time it takes to boil the water and cook the gnocchi. Just throw everything together at the end, and violà- dinner! It had me thinking "is that all I have to do?" which is definitely a good thing :)

It has a great, nutty flavor from the nutmeg and Parmesan, and feels like a great "transitioning into fall" dish. And while it's not exactly time to "transition into fall" quite yet, there's not nothing wrong with being prepared!


Gnocchi with Zucchini Ribbons and Cherry Tomatoes
(serves 4)

1 lb of fresh or frozen gnocchi (I used whole wheat)
2 Tablespoons of butter
1 shallot, chopped
1 large zucchini, very thinly sliced (I used a golden zucchini)
1 pint of cherry tomatoes, halved
1/2 teaspoon of Kosher salt
1/4 teaspoon of grated nutmeg
Freshly ground pepper, to taste
1/2 cup grated Parmesan cheese
1 handful of chopped fresh parsley

Directions: Slice the zucchini thin (with a mandoline slicer if you have one), chop the shallots, halve the tomatoes, and chop the parsley. Set each aside separately.

Bring a large pot of water to a boil. When it's boiling, add gnocchi. Cook until they float, for about 3-5 minutes.

Meanwhile, while you're waiting for the water to boil, melt the butter in a large saucepan over medium high. When it's melted, add the shallots and zucchini. Cook for about 5 minutes, until shallots and zucchini start to soften. Add the halved tomatoes, Kosher salt, pepper, and nutmeg, stirring occasionally. When gnocchi is done, drain it and add to the veggies. Stir to combine, and mix in the parsley and Parmesan. Enjoy!

Adapted from eatingwell.com, original recipe here.
Monday, August 15, 2011

CSA Basket- Week Ten

This week's haul included a red seedless watermelon, five red ripe tomatoes, two heirloom tomatoes, green leaf lettuce, a pint of heirloom cherry tomatoes, a bunch of escarole, a golden zucchini, a yellow squash, bok choy, a half pint of raspberries, a cubanelle pepper, a sweet German pepper, and a bunch of basil. 

I think I'm actually going to go back later in the week to buy extra tomatoes too, so I can make and freeze a tomato sauce for the months to come. 

Wednesday, August 10, 2011

CSA Basket- Week Nine

Holy tomatoes! We certainly got a lot of them this week :) This week's basket had nine ears of corn, a watermelon, an eggplant, two beets, two red ripe tomatoes, three heirloom tomatoes, five mini heirloom tomatoes, a pint of cherry heirlooms, a half pint of raspberries, and a zucchini.


Sunday, August 7, 2011

White Lemon Cake with Berry Topping

I tend to be an early riser. Well, I am if you compare me to H, at least. Out of the two of us, he is definitely the one who likes to sleep in. And while I love H dearly, I really savor those couple hours of the weekend morning that I have to myself before he wakes up and our day begins.

During the winter, those mornings are often spent wrapped up in a blanket, reading, listening to jazz, and drinking a home made peppermint mocha. In the fall, the windows are open; I'm loving the brisk wind and crisp, undoubtedly fall smell; and I'm more likely than not baking some sort of pumpkin treat or starting a big batch of chili.

This summer, I've been spending those mornings listening to some Ray LaMontagne or Amos Lee, appreciating the soft breeze of the ceiling fan, and putting coffee iced cubes in my morning cup. And yesterday morning, enjoying this cake. Really, really enjoying this cake.

This cake truly made my morning. It manages to be light, yet rich at the same time. The lemony sweetness of the cake is a perfect complement to the slight tartness of the berries. I just used blueberries in the topping, but I bet raspberries or blackberries would be just as delicious. 


White Lemon Cake with Berry Topping
(serves 12)

1/2 pint of berries
1 stick of butter, room temperature
3/4 cup of white sugar
1 egg white
3/4 teaspoon of lemon exract

1 cup of cake flour
1/4 teaspoon of baking soda
1/4 teaspoon of salt
1/4 teaspoon of baking powder

1/2 cup of buttermilk

Directions: Preheat oven to 350. Cut a parchment paper round to fit inside your cake pan. Grease parchment paper with a bit of butter, place it in the bottom of the cake pan, and spread berries out on top of the greased parchment. 

Beat butter and sugar together with medium speed for about 2 minutes, or until light and fluffy. Add egg white and lemon extract and beat for another 30 seconds. 

Combine all dry ingredients (cake flour, baking soda, salt, baking powder) in a small bowl and whisk to combine. Add 1/3 of dry ingredients to bowl while beating on low. Alternate with buttermilk, ending with dry ingredients, beating until just combined. 

Plop batter on top of the berries in the cake pan, and spread to the edges. Bake for about 30-35 minutes, or until slightly golden brown on top and the middle is no longer jiggly. (I used an 8" pan, so I may have needed a bit longer. If you're using a 9" pan, check after about maybe 25 minutes.) Allow to cool on a rack for 15 minutes, and then invert on to a plate. Cool completely before cutting, and serve with a dusting of powdered sugar. Enjoy!

Inspired by Smells Like Home, and adapted from The Powdered Plum, original recipe here.

Saturday, August 6, 2011

Summer Panzanella

I really don't know why it took me so long to try this recipe. I had bookmarked it last summer, but it fell through the cracks. Since the tomatoes are starting to get ripe now, I figured it would be a perfect time to finally make this dish. After all, fresh veggies and carbs are two of my favorite things :)

It was very easy and filling, and the flavors were just incredible! The vegetables and the bread really soak the flavor up. It is a great side for a picnic, or as a light week-day meal. Just make sure to keep the croutons separate from the salad until you serve it. Otherwise, they'll get soggy!


Summer Panzanella
(serves 4 as a main course, 6-8 as a side)

For the dressing:
3 Tablespoons of capers
4 Tablespoons of olive oil
3 Tablespoons of apple cider vinegar
3 garlic cloves, minced
1 teaspoon of Dijon mustard
1/2 teaspoon of Kosher salt
1/4 teaspoon of black pepper

For the salad:
3 bell peppers of different colors, sliced
1 medium red onion, sliced

2 large ripe tomatoes, cut into 1" chunks
1 large cucumber, peeled and sliced
20 leaves of basil, sliced

1 Tablespoon of olive oil
10 medium slices of Italian bread

Directions: Combine 1 Tablespoon of the olive oil for the dressing with the capers in a food processor. Pulse until they are a paste-like texture, and scoop into a bowl or dressing bottle. Add the other 3 Tablespoons of olive oil and the rest of the ingredients for the dressing and set aside. 

Place the chopped tomatoes and cucumber in a large bowl. Heat a little olive oil in a large saucepan, and add the pepper and onion slices. Sauté until they start to get a little soft, and then add them to the bowl with the cucumbers and tomatoes. Top with the torn basil. Pour the dressing on the salad, and allow it to marinate for at least 30 minutes. (Don't refrigerate, keep it at room temperature)

Preheat oven to 300. Grease a baking ban with the olive oil, and place slices of Italian bread on the pan. Bake for 7 minutes, remove, flip slices over, and bake for another 5 minutes. Slice bread into croutons. Set aside.

When ready to serve salad, combine with croutons in individual servings. (If you mix all the croutons with the salad and then happen to have left overs, the croutons will get soggy.) Enjoy!


Adapted from Ina Garten for foodnetwork.com, original recipe here.
Tuesday, August 2, 2011

CSA Basket- Week Eight

This week was quite a haul as well! We picked up a canary melon (I've never tried one before!), a cantaloupe, a pint of cherry tomatoes, a pint of heirloom cherry tomatoes, green leaf lettuce, an eggplant, a zucchini, a purple bell pepper, a bag of green beans, two heirloom tomatoes, three red ripe tomatoes, two ears of corn, two pickling peppers, and two mini heirloom tomatoes. Yum!

Monday, August 1, 2011

Tomato and Cheddar Pie with Herbed Mayonnaise

As soon as I saw this recipe in the August issue of Bon Appétit, I knew I had to make it. It had everything I love- a carbalicious crust, ripe summer tomatoes, and cheesy-oozy goodness. It turned out delicious, although it is pretty heavy and definitely an indulgent treat. The crust is very thick and rustic, and the herbed mayonnaise was so good I wanted to lick it up! I think there is a lot of potential for changing this recipe up too, with different kinds of cheeses and sauces.

The dough for the crust is very sticky and wet, but it turned out fine. And also be warned, it takes a bit of time to put together, and then needs to sit at least an hour after baking and before serving. So skip this one if you're in a hurry, the waiting was tortuous!


Tomato and Cheddar Pie with Herbed Mayonnaise
(serves 4)

For the crust:
2 cups of all purpose flour
1 1/2 teaspoons of baking powder
1/2 teaspoon of baking soda
1/2 teaspoon of Kosher salt
6 Tablespoons of butter, cut into 1/4" cubes
3/4 cup of buttermilk

For the mayonnaise:
1/2 cup of mayonnaise
1 scallion, sliced thin
2 Tablespoons of chopped fresh dill
1 Tablespoon of apple cider vinegar
2 teaspoons of white sugar
1/2 teaspoon of Kosher salt
dash of black pepper

For the pie:
3 large ripe tomatoes, sliced into 1/4" slices
6 oz. of cheddar cheese, shredded
1 oz. of Parmesan cheese, shredded
1 1/2 Tablespoons of cornmeal
1 Tablespoon of olive oil for greasing and brushing

Directions: Whisk flour, baking powder, baking soda, and salt together in a small bowl. Add butter cubes, and mix by hand until mixture resembles coarse sand and some small lumps remain. Add in buttermilk, mix until just combined and form dough into a ball. Wrap tightly in plastic wrap, and refrigerate for at least 1 hour.

Place sliced tomatoes on a baking sheet lined with 2 layers of paper towels. Cover with 2 more layers of paper towels, and lightly press down. Allow to sit for 30 minutes, to draw out the moisture.

Place all the ingredients for the mayonnaise in a small bowl, mix well, and set aside. Mix the cheddar and Parmesan cheeses in a separate bowl, and set aside as well.

Preheat oven to 425. Grease a 9" glass pie pan with half of the olive oil, and place the refrigerated dough in the pan. Press down on the middle of the dough, pushing it towards and up the edges. Sprinkle the cornmeal on the bottom of the crust. Top with about 1/4 of the cheese mixture, then place tomatoes overlapping in a circular pattern (pressing down slightly to push out the crust) on top of the cheese, and then spread 1/3 of the herbed mayonnaise on top of the tomatoes. Continue to layer cheese, tomatoes, and mayonnaise, ending with cheese, until all ingredients are finished.

Brush crust with rest of olive oil, and bake in preheated oven for 35 minutes, or until crust is golden brown and cheese is melted. Allow to sit for at least 1 hour before serving. Enjoy!

Adapted from Bon Appétit, original recipe here.

Monday, July 25, 2011

CSA Basket- Week Seven

This week has to be the biggest haul we've seen so far! We have a cantaloupe, a bag of green beans, a bunch of carrots, green leaf lettuce, purslane, four red ripe tomatoes, an eggplant, dill, green onions, a zucchini, a yellow squash, three picking cucumbers, and a pint of golden orange cherry tomatoes.I could barely fit it all in the picture!

Sunday, July 24, 2011

Sweet and Spicy Chinese-Style Eggplant

One of my co-workers has a very plentiful garden. Our office is extremely lucky, in that she often brings the bounty in to share with the rest of us. She brings in eggplants, all sorts of peppers, heirloom tomatoes, grape tomatoes, and zucchinis. This past week, there was a large basket full of eggplant that I could not pass up. I definitely took a couple home with me.

We've had a number of Italian inspired eggplant recipes lately, so I wanted to do something a little bit different. This recipe definitely jumped out at me, and I was curious to try it. It's actually meant to be made with Chinese eggplant, but it still tasted delicious with just regular eggplant. I loved the sweet and spicy combination of flavors, and was a cinch to throw together!


Sweet and Spicy Chinese-Style Eggplant

1 medium eggplant, peeled and cut into chunks (or 2 long Chinese eggplants)
1 teaspoon of salt

3 Tablespoons of soy sauce
2 Tablespoons of rice wine vinegar
2 Tablespoons of white sugar
2 teaspoons of corn starch
dash of red pepper flakes

1 Tablespoon of sesame oil

Directions: Place eggplant cubes in a large bowl, and sprinkle with the salt. Fill bowl with just enough water to cover the eggplant, and set aside for 30 minutes.

Meanwhile, whisk together soy sauce, rice wine vinegar, sugar, corn starch, and red pepper flakes.

Drain water from bowl with eggplant, and pat eggplant dry with paper towels. Heat the sesame oil in a large non-stick skillet or wok. Add eggplant, and cook over medium stirring occasionally until eggplant is mostly brown. Add sauce, stir to coat, and cook for another couple minutes. Serve immediately. Enjoy!

Adapted from allrecipes.com, original recipe here.

Tuesday, July 19, 2011

CSA Basket- Week Six

This week, we received two heirloom tomatoes, two red tomatoes, four ears of sweet corn, a zucchini, a bag of green beans, a bunch of swiss chard, a head of green leaf lettuce, and a bunch of purslane. I am so excited it's getting to be tomato season. There is some gazpacho and stuffed tomatoes on the menu this week!

Monday, July 18, 2011

Cherry Hand-Pies

Last week our grocery store had an amazing sale on cherries. Needless to say, we now have ... quite a lot of cherries. While H loves to snack on them and I froze a bit more for later, there was still a lot left over that I wanted to use for some baking. When I saw these little hand-pies, I knew they were exactly what I wanted to make.

I loved the concept- all the tasty goodness of a pie, but ... portable. (As if the lack of mobility is what was missing from your traditional pie.) It's possible though! These are perfect for a cookout or a picnic, where it might be too messy and difficult to bring, slice, and eat a full pie. Just grab one of these babies!


Cherry Hand-Pies

for the dough:
1/2 teaspoon of vanilla extract
8 Tablespoons of cold buttermilk
2 1/2 cups of all-purpose flour
2 Tablespoons of sugar
1/2 teaspoon of salt
1 teaspoon of lemon extract (or 2 teaspoons of lemon zest)
2 sticks of cold butter, cut into 1/4" pieces
powdered sugar, for dusting

for the filling:
4 cups of cherries, pitted and halved
1 Tablespoon of lemon juice
1 Tablespoon of cornstarch
1/4 cup of sugar

for finishing:
1 egg, beaten
1/2 cup of sugar

Directions: Combine buttermilk and vanilla extract in a small mixing bowl. Add flour, sugar, salt, and lemon extract (or zest) to the bowl of an electric mixer fitted with the paddle attachment. Give it a quick beating to combine. Add the butter cubes, and mix on low speed until the mixture resembles coarse sand. Remove bowl from mixer, add buttermilk/vanilla mixture, and mix by hand until dough just comes together. Move dough to a powdered sugar covered surface, and flatten into a thick disk shape. Wrap dough tightly in plastic wrap, and refrigerate for at least 1 hour.

Meanwhile, put three cups of cherries in a large mixing bowl. Pulse the remaining one cup of cherries in a food processor with the lemon juice until they are a thick liquid. Add the cornstarch to the cherry liquid, and whisk until combined. Then add the sugar, and stir to combine. Add the liquid back to the bowl of cherries, and stir to coat.

Take the dough out of the refrigerator, and place on a powdered sugar-dusted surface. Divide dough into 12 equal parts, and roll each part into a 6" circle, about 1/8" thick.

Preheat oven to 400. Have beaten egg and sugar, as well as cherry filling ready in bowls. Place a dough round on a parchment paper-covered baking sheet. Spoon about 3 Tablespoons of cherry mixture into the center of the dough. Brush the edge of one half of the dough round with beaten egg. Fold opposite side of dough over to meet the egg-brushed side, into a half circle-shape Press edges together, containing the cherry filling. Brush tops of pies with egg, and sprinkle with the sugar. Cut three 1" slits in the dough to let steam escape. Repeat with remaining dough.

Bake for about 20 minutes, or until tops start to turn golden brown. Allow to cool on pans for 10 minutes, and then transfer to wire racks to cool completely. Enjoy!

Adapted from Annie's Eats, original recipes here and here.

Friday, July 15, 2011

Watermelon and Feta Salad with Roasted Green Beans

Some summer nights, I really just want a salad for dinner. They're light, cool, refreshing, and (usually) you don't even have to turn the oven on. This recipe doesn't meet ALL of that criteria since you do have to roast the beans, but it is still a wonderful and easy summer recipe. And bonus- the roasted green bean recipe within the salad recipe are my absolutely favorite way to eat green beans as it is, and a great side dish for anytime of year.

I love the sweet and salty combination of the watermelon and feta, and the green beans give it a nice sensory kick.


Watermelon and Feta Salad with Roasted Green Beans
(serves 2)

for the salad:
1/2 pound of raw green beans, washed and trimmed
1 Tablespoon of olive oil
1 teaspoon of Kosher salt
1/2 teaspoon of black pepper

4 cups of baby spinach
1/8th of a seedless watermelon, cut into small cubes
1/2 cup of crumbled feta cheese

for the dressing:
1 lime, juiced
2 Tablespoons of olive oil
1 Tablespoon of chopped, fresh basil
1/4 teaspoon of Kosher salt
dash of black pepper

Directions: Preheat oven to 375. Grease a metal baking sheet with 1 Tablespoon of olive oil. Place beans on the baking sheet, and toss with a spatula to coat with the oil. Sprinkle the Kosher salt and black pepper on the beans, and cover the baking sheet with foil. Place in the oven for 10 minutes, remove foil, and return to oven for 8-10 minutes more.

Meanwhile, combine all ingredients for the dressing in a bottle, and shake well. Place spinach on plates, and when green beans are done, place them on the spinach. Top with the watermelon and feta, and drizzle on the dressing. Enjoy!


Adapted from Ina Garten, for foodnetwork.com, original recipe here.

Monday, July 11, 2011

CSA Basket- Week Five

This week in our produce basket, we got three cucumbers, two pints of cherry tomatoes, a large heirloom tomato, a giant eggplant, red and green swiss chard, green onions, and two ears of corn. I have a feeling it's going to be a good week!

Chimichurri Sauce

We had a beautiful bunch of parsley in our CSA basket this week and some cilantro leftover from the BBQ chicken burgers, so I decided to make a chimichurri sauce (fairly non-authentically, as it turns out). But nevertheless, it was very tasty and easy!

I served it over NY strip steaks, but I bet it would be good on pretty much any cut, or even on chicken or pasta, since it is extremely similar in texture to pesto. It'd be a simple way to add great flavor to a lot of different foods.


Chimichurri Sauce

1 cup of parsley
1/2 cup of cilantro
1 Tablespoon of red wine vinegar
2 Tablespoons of olive oil
2 cloves of garlic, minced
1/2 teaspoon of cumin
dash of red pepper flakes
Kosher salt and pepper to season

Directions: Combine all ingredients in a food processor, and pulse until chopped and well combined. You may want to drizzle an extra bit of olive oil, to get it to a bit more liquid consistency. Enjoy!

Adapted from epicurious.com, original recipe here.

Friday, July 8, 2011

BBQ Chicken Burgers

I know I describe a lot of food on this blog (either dishes from a restaurant or recipes that turn out well) by saying it is "to die for." And these burgers are no different. I made these for our Fourth of July barbecue, and they were a huge hit! They are SO juicy and flavorful and out of the ordinary. 


Just a head's up though- this recipe calls for pulled pork, so plan ahead! I used this recipe, which is for crock pot Hawaiian Kalua pork. The pork recipe is very basic, as I didn't the pork to be too heavily seasoned and compete with the flavor of the burgers. It was extremely easy, it just required a bit of extra time. You could probably leave the pork out, but I really think it took these burgers to the next level.
 

BBQ Chicken Burgers
(makes about 10-12 burgers)

for the burgers:
2 lbs of ground chicken
1/2 cup of cornmeal
3 scallions, chopped
1/4 cup of cilantro, chopped
1/2 medium onion, minced

1 teaspoon of paprika
1/2 teaspoon of  garlic powder
2 teaspoons of dry mustard
1 teaspoon of Kosher salt
1/4 teaspoon of cayenne pepper
2 Tablespoons of brown sugar

1 1/3 cups of pulled pork
4 Tablespoons of BBQ sauce

for serving/cooking:
extra BBQ sauce for basting
2 red onions, sliced into rings
8 oz. of sharp cheddar cheese, sliced
hamburger buns

Directions: Put all of the ingredients for the burgers in a large bowl. Hand mix until everything is well combined. Form about 12 equal sized patties. (I froze the patties for about 30 minutes to make them a bit more solid, since they were pretty sticky and fragile.)

Grease your grill grate, and place burgers and onions on the grill. Close the lid, and allow to cook for about 2-3 minutes. Flip the onions and burgers, and brush BBQ sauce on grilled side of the burgers. Close lid again, and cook for another 2 minutes. Flip the burgers again, top with cheese, and close the lid. Cook for about 1 minute, or until cheese is melted. Assemble burgers on buns with grilled onion, and extra BBQ sauce if desired. Enjoy!


Adapted from Pink Parsley, original recipe here.

Wednesday, July 6, 2011

Red Velvet Cupcakes with Cream Cheese Frosting

Some people feel red velvet cupcakes are a perfect Valentine's Day treat. I don't disagree, but I certainly wouldn't limit them to that holiday. I think they're perfect for many other occasions. Like Mondays. Or for the Fourth of July. I mean, they're red! What could be more perfect? With the white cream cheese frosting and some blue sugar sprinkles, they are perfectly patriotic little treats.


Red Velvet Cupcakes with Cream Cheese Frosting
makes 24 (and maybe a bit more) cupcakes

For the cupcakes:
5 Tablespoons of butter, softened
1 3/4 cups of sugar
2 eggs

1/4 cup of red food coloring (the liquid kind)
1/4 cup of unsweetened cocoa powder

2 cups of cake flour
1 3/4 cups of all-purpose flour
1 teaspoon of salt
1 teaspoon of baking soda

2 teaspoons of vanilla extract
1 cup of buttermilk

1 cup of sour cream
1 Tablespoon of white vinegar

For the frosting:
8 ounces of cream cheese, at room temperature
5 Tablespoons of butter, softened
2 teaspoons of vanilla extract
2 1/2 cups of powdered sugar

Directions: Preheat oven to 350. Line standard-size cupcake tins for 24 cupcakes.

In a large mixing bowl, beat butter and sugar with medium speed until light and fluffy. Add eggs, one by one, beating after each one. Turn mixer off.

Whisk red food coloring and cocoa powder together in a bowl until combined. Add to mixing bowl, beating until incorporated.

Mix the 4 dry ingredients- cake flour, all-purpose flour, salt, and baking soda together in a separate bowl. Combine the vanilla and buttermilk. Turn the mixer back to medium, and add the dry ingredients to the mixing bowl in three batches, alternating with two batches of the wet ingredients. Beat until just combined.

Add vinegar to the sour cream, stir to combine, and add to the mixing bowl. Beat on low until just combined.

Fill cupcake tins 3/4 full. (You may end up with slightly over 24. I think mine made 27.) Bake for 18-20 minutes, or until a toothpick comes out clean. Allow to cool in pans for five minutes, and then move to racks to cool completely.

For the frosting: Beat butter, cream cheese, and vanilla together in a bowl with medium high speed until smooth and creamy. Slowly add powdered sugar, while continuing to beat mixture until it reaches the desired consistency. (If you're looking for a stiffer frosting, you may need to add more powdered sugar.) Frost cupcakes, and enjoy!


Adapted from Confections of a Foodie Bride, original recipe here.

Tuesday, July 5, 2011

CSA Basket- Week Four

Hope you all had a good weekend and a happy fourth!

This week in our produce basket we got two cucumbers, two zucchini, kohlrabi, parsley, escarole, kale, and a bag of green beans. I'm excited to be getting some new things, especially the kohlrabi. I'm going to have to find some recipes for that!
 

Wednesday, June 29, 2011

Green Cabbage with Bacon over Pierogi

I had wanted to make something a bit lighter and more summery with the cabbage we had, but I was really, really trying to avoid going to the grocery store this week. (I've been successful so far!) And since I had a big bag of pierogi and a package of bacon in the freezer, I decided to turn to my trusted cabbage-over-pierogi recipe.

I've made this many times in the past and it is incredibly easy to throw together. It also makes delicious leftovers! It is probably more appropriate for a cold winter day, but it tastes just as good in the summer!


Green Cabbage with Bacon and Pierogi
(serves 4)

4 slices of bacon

1/2 large white onion, sliced

1/4 cup of water
2 Tablespoons of white sugar
4 cloves of garlic, minced
2 teaspoons of caraway seed
pinch of salt and black pepper
1 large head of green cabbage, roughly chopped

12 frozen pierogi, such as Mrs T's

1/2 cup of sour cream (fat free is fine)

Directions: In a large saucepan, fry bacon over medium heat until cooked. When done, remove the bacon from pan and place on paper towels. Keep bacon drippings in the pan, and add the onion to the same pan. Cook for about 4 minutes, and then add the water, sugar, garlic, caraway seed, salt, and pepper. Stir to combine. Add cabbage to pan, keep at medium heat, and cover. Cook for 10 minutes.

After 10 minutes, remove lid and stir to combine, especially scraping up any browned onions from the bottom. Re-cover and cook for another 10 minutes.

Meanwhile, prepare pierogies according to package directions. Pulse bacon in a food processor, until it is chopped to large crumbs. When pierogies are done, place on a plate and ladle the cooked cabbage on top of them. Top with a dollop of sour cream and fresh bacon bits. Enjoy! 


Adapted from allrecipes.com, original recipe here.

Tuesday, June 28, 2011

Romaine and Purslane Salad with Tomatoes

I was searching for a different way to prepare the purslane that we had in our produce basket this week. I knew I wanted to saute it, to see what kind of flavor that gave it. When I found the recipe for this salad and saw that it also used zucchini, I knew it was going on the list to make!  

I loved the flavor in this salad, and the combination of the warm vegetables over the cold lettuce! It was very filling, and would even be perfect for a light, summer meal.


Spinach and Purslane Salad with Tomatoes and Zucchini

1/2 of a medium white onion, diced finely
2 cloves of garlic, minced
1/3 cup of olive oil, plus extra for greasing pan
3 Tablespoons of lemon juice

1 teaspoon of Dijon mustard
1 teaspoon of parsely
pinch of salt and black pepper

1 large zucchini, sliced
6 plum tomatoes, chopped
1 bunch of purslane, washed and thick stems removed
1 large head of romaine, washed and chopped

Directions: Pour a little bit of the olive oil into a saucepan, and heat to medium. Saute onions until mostly soft, stirring occasionally. Add garlic, and saute for about another 1 minute. Remove from heat.

Combine lemon juice, Dijon mustard, olive oil, salt, pepper, and parsley in a salad dressing bottle. Shake well to combine. Add onions and garlic from pan, and shake again.

Heat a bit more olive oil in the pan, add zucchini, cover, and cook until soft and slightly browned (about 5-7 minutes) and when it's done, place it in a large bowl.

Add purslane and chopped tomatoes to the pan vacated by the zucchini, and saute for about 1-2 minutes, or until purslane is slightly wilted. Then add to the bowl with the zucchini and stir to combine. Spoon tomato/zucchini/purslane mixture on top of romaine, and drizzle with the lemon Dijon dressing. Serve immediately. Enjoy!

Adapted from Epicurious.com, original recipe here.