Tuesday, May 3, 2011

Mussels with a White Wine Tomato Sauce

I love the mussels at my favorite Belgian tavern in the city, Eulogy. They are to die for; they are so tender and the sauce is amazing to soak up with the hunks of bread they give you. And their beer list is nothing to shake a stick at either! I've always wondered if I could recreate something like them at home, and finally decided to give it a try.

This recipe wasn't inspired by anything in particular that my tavern has, but they were very tasty. I served it over angel hair pasta and spinach to turn it into a meal, but it would be great as an appetizer as well. Either way though, you definitely need a big hunk of bread to mop up all that delicious sauce!


Mussels with a White Wine Tomato Sauce
(Serves 2)

1 Tablespoon of olive oil
4 cloves of garlic, minced
1/2 of a medium white onion, diced

1/3 cup of dry white wine
1 cup of clam juice
1 (14.5 oz.) can of diced tomatoes with juice
1/4 teaspoon of crushed red pepper
black pepper

1 pound of fresh mussels

Directions: Heat olive oil in large stock pot over medium heat. Add minced garlic and onions and cook until fragrant and onions are soft. Add white wine, and allow to reduce slightly. Add clam juice, tomatoes with juice, red pepper, and a dash of black pepper. Bring to a boil, then reduce to a simmer for about 20 minutes to let the flavors blend together.

Rinse mussels, and discard any that have opened. Bring the sauce back to a boil, and add mussels. Cover and allow to boil for 6-7 minutes, occasionally giving the pot a fast rotate/shake to allow the mussels to cook evenly. Remove mussels with a slotted spoon, and ladle the sauce on top. Enjoy!

Adapted from allrecipes.com, original recipe here.

Sunday, April 24, 2011

Lemon Cupcakes with Raspberry Filling and Lemon Buttercream

Happy Easter! Hope you are having as lovely of a spring day as we are here!

We had a nice relaxing morning, and then attempted to dye some eggs, which didn't turn out as gorgeous as we hoped. We are headed out to H's parents' house for dinner soon for a nice, small get-together.

MIL said it would be great if I could bring a dessert, and we all know what the answer to that was! I found a number of desserts incorporating Cadbury Creme eggs (swoon), but I doubted they'd be as much of a crowd-pleaser as I would hope (although I may have to try some of them soon!). I love the combination of lemon and raspberry, and decided on something using those light, spring-y flavors: lemon cupcakes filled with raspberry jam and topped with a lemon buttercream.


Lemon Cupcakes with Raspberry Filling and Lemon Buttercream
(makes 24)

For the cupcakes:

3 cups of all-purpose flour
1 Tablespoon of baking powder
1/2 teaspoon of salt

2 cups of sugar
2 sticks of butter, at room temperature

4 large eggs
1 teaspoon of vanilla extract
zest and juice of 3 lemons
1 cup of buttermilk

For the filling:
1 1/2 cups of seedless raspberry jam

For the frosting:
1 1/2 sticks of butter
2 cups of powdered sugar
3/4 teaspoon of lemon extract

Cupcakes: Preheat oven to 325. Line 24 standard cupcake tins.

Whisk together flour, salt, and baking powder in a bowl.

Cream butter and sugar with a mixer on medium until pale and fluffy. Add eggs, one at a time, and mixing after each. Mix in the lemon zest (should be about 3 Tablespoons) and the vanilla. Add the flour mixture, alternating with 2 Tablespoons of lemon juice and the buttermilk, and mix until just combined.

Fill tins about 3/4 full of batter, and place in oven for 12 minutes. Rotate, and place back in oven for another 10-13 minutes, or until they are starting to turn golden brown.

Let cool completely on a wire rack.

Filling: Fill a pastry bag with the raspberry jam (I found it easier to use half the jam at a time and refill when needed) and attach a medium-sized round tip (I used Wilton #10). Use a small, sharp knife at a very shallow angle to cut a circle out of the top of the cupcake. Then knock a bit of cake off of the bottom of the piece you remove and set it aside. Use a very small spoon (I use a 1/4 teaspoon measuring spoon) to hollow out the cupcake a bit more, careful to not hit the bottom. Fill with the jam, and place the top back on, pressing down and wiping away any extra jam as needed.

Frosting: Cream butter on medium high until light and fluffy (about 1-2 minutes). Lower the mixer to medium and add the powdered sugar in 1/2 cup increments, scraping down the sides as necessary. Add in the lemon extract after the sugar. Place mixer on high for 10 seconds to aerate the frosting. Frost cupcakes as desired. (I split up the frosting in 4 bowls, added a different gel paste color to each, frosted with a butter knife, and topped with sprinkles). Enjoy!

Cupcakes and frosting adapted from Martha Stewart, original recipes here and here.

Saturday, April 23, 2011

Hawaiian Pork Kabobs with Pineapple Rice

 One of my favorite parts of the warmer weather is definitely being able to cook dinner on the grill outside. I love the delicious smell that floats through the air as dinner is grilling away, and that smoky flavor the food has when it's done. It's also a great time to enjoy a cold beer or nice mojito on the porch after a long day!

This one has great, classic flavors and would be easy to throw together throughout the spring and summer.

Hawaiian Pork Kabobs with Pineapple Rice

1 (large) can of pineapple chunks, drained with juice set aside

2 boneless pork loin chops, cut into 1" cubes
Kosher salt
black pepper

2 bell peppers (yellow, orange, or red) chopped into 1" chunks

1/2 cup of brown rice
2 scallions, diced
1/2 teaspoon of ground ginger

1 lime, cut into wedges for serving

Directions: Season cubes of pork with a dash of Kosher salt and black pepper. Place in pineapple juice (with the pineapple chunks already removed), and allow to marinate for about 30 minutes.

Split pineapple chunks into two separate bowls. Alternate pork cubes with peppers and one bowl of the pineapples on skewers. Place skewers over indirect heat on the grill for about 10-15 minutes, or until edges start to char, rotating once.

Meanwhile, place other bowl of pineapple chunks into a food processor and pulse for a few seconds to a pulp. Cook the rice according to package directions. When it's done, mix in the scallions, pineapple pulp, and ginger; stir to combine. Serve with the pork kabobs. Enjoy!

Adapted from Annie's Eats, original recipe here.

Sunday, April 17, 2011

Tortellini with Spinach and Prosciutto

I am really starting to love these recipes I've been getting from Cooking Light lately. The past few I have tried have been so fast and easy to throw together on a busy weeknight, they have good, wholesome ingredients (for the most part), and boy are they tasty. This was definitely another one, and I am excited to make it again!


Tortellini with Spinach and Prosciutto

1 16 oz. package of cheese tortellini

1/4 cup of pine nuts

1 Tablespoon of olive oil
2 Tablespoons of dry white wine
1 10 oz. package of baby spinach
6 cloves of garlic, minced

4 oz. of prosciutto, thinly sliced and torn into smaller pieces

black pepper
2 oz. of Parmesan cheese, grated

Directions: Bring water to boil in a large saucepan. When water is boiling, add tortellini. When they are all floating, that means they are finished cooking.

Meanwhile, heat a non-stick pan over medium heat, and add nuts to pan, stirring occasionally. Cook until toasted- about 1 1/2 minutes, and then set aside. (I totally forgot this step and it was still delicious)

After nuts are done, heat olive oil and wine in the non-stick pan, and add minced garlic. Cook a few minutes, until fragrant and slightly reduced, and then add spinach. Cook until mostly wilted, stirring occasionally. Remove from heat, and add prosciutto.

Drain pasta, place in a large bowl, and add spinach prosciutto combination. Stir to combine, and top with pine nuts, a dash of black pepper, and the grated Parmesan cheese. Enjoy!

Adapted from Cooking Light, original recipe here.

Friday, April 15, 2011

Salmon with Orange Caper Relish

Yikes! It has certainly been a while, hasn't it? I don't have any excuses, I'm just going to have to jump right back in to this whole blogging world!

We've had some wonderful weather lately, lots of sunny days in the 50's and 60's. I'm really enjoying it. Some years the weather seems to skip spring completely- one day it's in the 30's and the next is in the 70's. So I'm really trying to savor it this year. H and I have already broken out the grill, and have enjoyed dinner outside on the patio a number of evenings so far. (Eating outside with the late sunlight does wonders for the quality of my photos too- certainly can't complain about that!)

I'm also starting to gravitate towards lighter, spring-ier dinners, and this is definitely one of them. This was so easy to throw together, and had great flavor. I served it with roasted asparagus and a side salad.


Salmon with Orange Caper Relish
(serves 4)

1/4 of a large red onion, cut into slivers
splash of olive oil
3/4 cup of orange marmalade
1 Tablespoon of orange juice
1 Tablespoon of olive oil
1 teaspoon of rice vinegar
2 Tablespoons of capers

2 salmon fillets- 1/2 lb. each
kosher salt
pepper
splash of olive oil

Directions: Saute red onion slices in olive oil until softened, about 3-4 minutes. Place in a bowl, and mix in next 5 ingredients, up through the capers. Place in the refrigerator to chill through the rest of the prep.

Coat a large cast iron skillet lightly with olive oil and heat to medium-high. Season salmon fillets with kosher salt and pepper, and place on the skillet. Cook on each side for about 4-5 minutes, or until cooked through. Remove from pan, and top with orange caper relish. Enjoy!

Adapted from Cooking Light, original recipe here.

Saturday, March 5, 2011

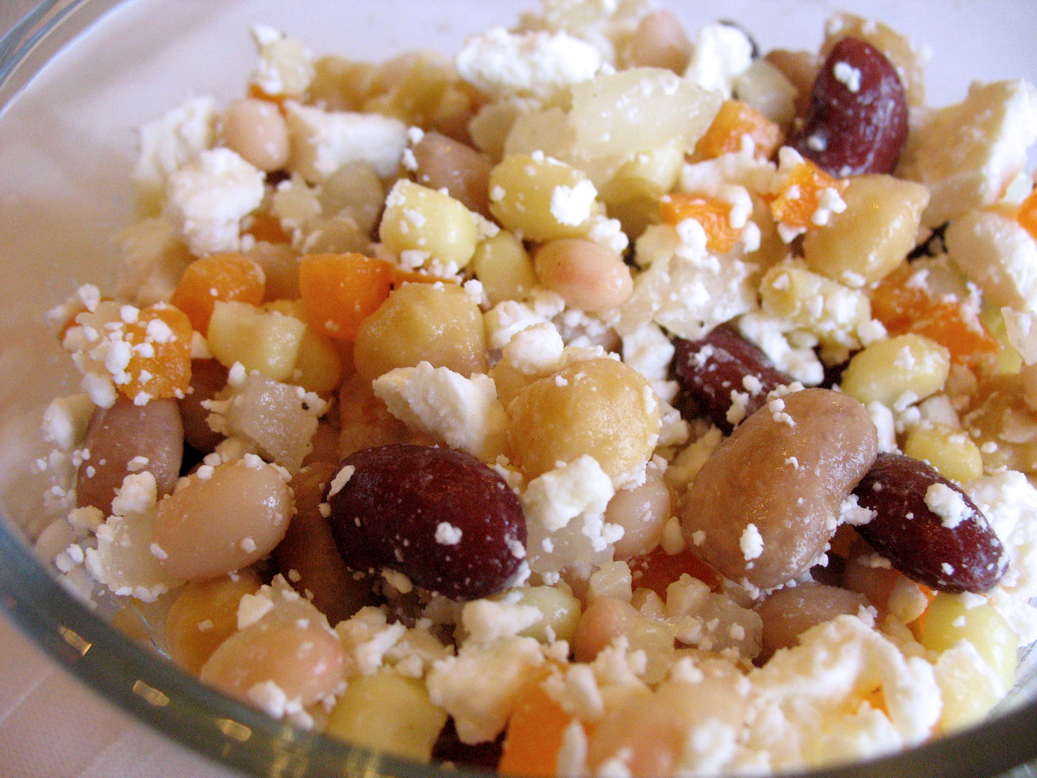
Five Bean Salad

I've been feeling a bit groggy in the afternoons recently.

My go-to fix is a second (or third) cup of coffee, which I know isn't the greatest choice. It rarely gets me out of my fog and more often than not, it just gives me a bad case of jitters. I did a bit of research (aka Googling), and it finally dawned on me that the high number of carbs in the sandwich and fruit that I usually eat for lunch may be contributing to that sleepiness later. Maybe steering more towards a high-protein lunch could be the solution I need.

So I started looking for lunch ideas of the high-protein variety, and found this one. I love that it's so versatile. You can certainly switch up the varieties of bean you use, or skip any if you don't like them. Definitely tasty, and definitely healthy!


Five Bean Salad

2 cups of black beans
2 cups of pinto beans
2 cups of navy beans
2 cups of garbanzo beans (chickpeas)
2 cups of kidney beans

1 package of frozen white corn
1 red bell pepper, chopped
1 green bell pepper, chopped
1 medium white onion, chopped
1 Tablespoon of minced garlic

3 Tablespoons of olive oil
3 Tablespoons of red wine vinegar (I ended up using a bit more)

salt and ground pepper to taste

Directions: Cook frozen corn, and then mix all of the beans and vegetables. Drizzle with olive oil and vinegar topping, salt and pepper to taste, and stir to combine. Enjoy!

(This is a great base recipe, and I've been adding lots of different things for more flavor- I've tried feta cheese, cilantro, cooked shredded chicken breast, and a can of tuna. All of those mix-ins have turned out well. I also love the extra boost of protein some meat or cheese brings in.) 

Adapted from SparkPeople, original recipe here.

Wednesday, February 23, 2011

A Dining Room Transformation

It's amazing how sometimes the smallest things can make the biggest differences. And while the thing I'm referring to isn't exactly small, I definitely didn't expect it to pack quite the punch it did.

H and I decided to see what the stores had to offer on Black Friday last year, and there were definitely some good deals. I had wanted to put a mirror above the buffet in the dining room for a long time now, and when we found this gorgeous frame for 60% off, I scooped it up right away. We bought some mirror glass for it, and this past weekend, we FINALLY got around to getting it framed.

And while the guy at the framing department at Michael's kind of laughed at us for not doing it ourselves, I really thought it would best be done by a professional. I didn't want to ruin H's grandmother's antique buffet, or be cleaning up shards of glass for days on end, after the glass would have inevitably fallen out of the frame.

Here is the before (at Christmas):


And here it is now:


But anyway, I love how it turned out! It really anchors the dining room, and it's a great focal point. I think it makes the room look more formal as well, and I love how it reflects the kitchen. I just really love those little things that make such a big difference! We are slowly coming along...